
The front sprocket on a Rotax MAX engine can be swapped for another to make a large change to gearing, or when wear on the sprocket requires replacement. In both cases, the clutch drum will need to be removed and re-installed.
If you notice the front sprocket is worn, it’s probably a good idea to also replace the chain, and maybe the rear sprocket as well as all these components will wear out. Excessive wear will cause drag and eventually lead to failure.
Power Republic’s Derek Jones has prepared this step-by-step guide and video on changing the front sprocket on the Rotax MAX FR125.

advertisement
The Tools Required:
- Torque wrench able to do 110Nm (optional)
- Breaker bar
- 16mm or 17mm ring spanner
- 5mm Allen key
- 38mm impact socket
- 17mm impact socket (optional)
- 5mm in-hex socket (optional)
- Rotax sprocket holder & locking tool for ring gear
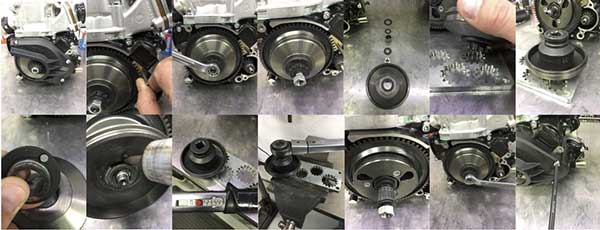
The Steps Involved:
- Remove the clutch/chain cover by undoing the 3 x M6 cap screws
- Insert the Rotax locking tool into the ring gear to lock it in place
- Remove clutch retaining nut and washer
- Remove clutch drum from engine
- Put the clutch drum into the sprocket holding tool and use the 38mm socket to remove the sprocket retaining nut from the drum
- Remove front sprocket dowel pin from clutch drum and insert the new sprocket into the clutch drum (don’t forget to re-insert the dowel pin). Use Loctite on thread to retain nut on sprocket
- Insert sprocket into sprocket holding tool and tighten the nut to 110Nm
Re-installation is the reverse process of the above steps:
- Install the thrust washer, o-ring, bearing, then the clutch shoe, retaining washer and finally retaining nut (don’t forget to use some Loctite on the retaining nut)
- Re-fitthe clutch/chain cover and you’re done!
 Power Republic
E: powerrepublicengineering@gmail.com
W: powerrepublic.com.au
M: 0410 205 252

advertisement